Introduction: Do you know how to use a current probe? What needs to be noticed during use? I. Precautions: This classification mainly includes the aluminum alloy die casting Wiper parts using in Auto area,the raw material is aluminum alloy. Automotive Wiper Parts,Auto Windscreen Wipers Parts,Car Wipers Parts,Auto Wiper Parts NINGBO ZHENHAI BOLANG METAL PRODUCTS FACTORY , https://www.casting-part.com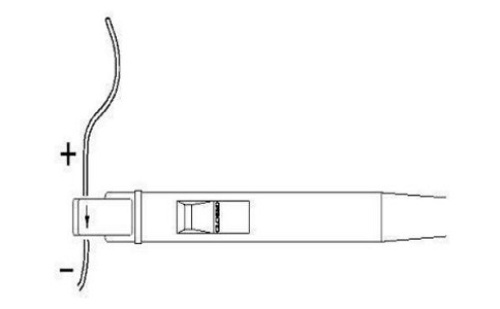
1. Please read the safety precautions and probe range carefully.
2. The clamp-type current probe must push the slider to the end until the probe shows: "CLOSED";
3. The active current probe needs to be warmed up for more than 20 minutes before each measurement to ensure the accuracy of the measurement results;
4. Degauss the probe after each measurement to avoid the impact of remanence on the measurement results;
5. If higher measurement accuracy is required, use Tektronix-specific current calibration fixtures for calibration before each use.
6. Note the current direction:
Demagnetization and balance of the probe
For accurate measurements, you must often degauss and balance the probe. Degauss can eliminate the parasitic magnetic field in the probe core, otherwise it will cause zero drift and measurement error. After each degaussing, the zero balance of the probe needs to be adjusted to eliminate the existing offset. Degaussing and balancing are required under the following conditions:
· Each time the oscilloscope is turned on for 20 minutes;
· whenever overload occurs;
· whenever the probe is exposed to a strong magnetic field;
· Each time a no-load DC offset is found to be non-zero.
Degaussing and balance adjustment steps:
• Set the oscilloscope input channel to zero reference point.
• Connect the output of the probe to the oscilloscope. If it is a TCPA series or TCP202 current probe, and an oscilloscope using a Tektronix TDS3000 or higher model, the oscilloscope will display the channel!
· The scale is set to amps/div.
• If the probe does not clamp any wire, push the slider all the way until CLOSED is displayed.
Press DEGAUSS button.
• Turn the oscilloscope to a minimum scale, such as 1 mA/div or 10 mA/div. Adjust the balance knob until the waveform trace coincides with zero.
Three. Measuring large DC current
Reverse bias current through the second wire: increase the bias current, measure the difference between the two sets of wires, plus the bias current.
Four. Measuring a small DC current
By adding winding method.
In the die casting process,higher specific pressure is required, so that higher filling speed can be obtained.which is beneficial for alloy to overcome mold filling resistance.and effectively fill each part of the cavity.The Casting General Tolerance is Grade GB-CT4.
Process Technology: High pressure die casting, Cold Chamber
Product Dimensions: Customized
Casting General Tolerance: Grade GB-CT4
Flow Processes: Die casting, Degating to remove the residual of the gate, Polishing and Deburring to remove the burrs, Polishing to remove the parting line, flash,CNC Turning, Cleaning, Packaging, Storaging, Shipping
Control Measure: Incoming Material Test, First Article inspection, Routing inspection, Final item inspection, and Outgoing quality control
Inspection Equipment: CMM, Caliper, Plug Gage, Screw Gauge
Application: Machinery Parts
Certificate: IATF16949:2016,ISO14001:2015,ISO45001:2018
Lead Time: 30-35 days
Trade Term: FOB Ningbo